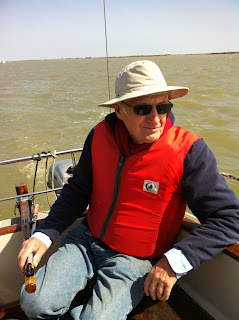
Tuesday, May 31, 2011

Building ‘Sharpy’ Part 103

Foredecks almost finished.

The final deck panel is in place. I spent time sanding the decks, finishing the hole for the mast and making the coamings which are laminated with inner and outer 4 mm pieces of plywood. When I get hold of a small quantity of epoxy I shall be able to fit them. Meanwhile I can screw them to the decks.

Trimmed mast hole, but a collar has to be made for keeping water out


Before I paint the hull I must attach two central rubbing strips to the bottom of the boat, one in front of the keel box and the other behind it. I’ll need to shorten the boom and yard to match the sail; then I’ll be able to varnish the spars.

Testing the fit of the inner pieces of the coamings


I may make a trolley for the boat as per Derek Munnion’s plan. The trolley can also be used for transporting the keel weights, but I must first explore possibilities of having ‘Sharpy’ on her trailer, complete with her keel which would make it easy to launch.

Monday, May 30, 2011

Building ‘Sharpy’ Part 102

Three deck panels trimmed

Transom trimmed

Three of the deck panels have been trimmed to the edges of the gunwales, and the starboard forward deck panel has been bonded to the hull. My next tasks will be trimming the recently applied deck panel and smoothing epoxy where it joins the adjacent panel. Then I shall have to make coamings, and fix the central rubbing strips on the bottom of the hull, one in front of the keel, and another after it.

Last deck panel in place

Some thought will be required regarding the coamings, because if I want to add a spray deck I’ll have to work out how to attach it, perhaps with press studs, or elastic under hooks, or a rim that would run along the upper edge of the coamings; I could also choose Velcro.


I had decided to paint the outside of the hull off-white, almost cream International Toplac gloss paint, but I have used what I bought for it when I did the interior. I’m now hesitating about the colour, and I may go for a bolder one to make the boat more visible when at sea. Yellow would be sensible, but it may clash with the red sail. At this stage there’s no need to apply antifouling, because ‘Sharpy’ will not be in the water long enough for marine growth to establish itself on the hull.


I’m still referring to the boat as ‘Sharpy’. However, I can’t name her as such, because the designer’s boat has that name. Naming a boat is not a simple matter, at least, not for me. I want it to be short and appropriate for this boat type. I would also want the name to be expressive regarding the use to which she will be put, i.e., day sailing, camp cruising and possible adventure sailing, depending on how good she turns out to be. I would define ‘adventure sailing’ as short coastal passages and the occasional short offshore venture, such as a trip from Newlyn to St Mary’s, the Scilly Isles.


I must not run before I can walk; therefore I’ll need to take things easily until I know how she performs. I believe I’m right in saying the prototype has never sailed in conditions beyond a Force 4 on inland waters. My version of ‘Sharpy’ is stronger than the designer’s because she has framed frames and her frames are epoxied to the deck panels, making them absolutely watertight. This also stiffens the hull considerably. She’ll be a heavier boat than the prototype.

Sunday, May 29, 2011

Building ‘Sharpy’ Part 101

Before fixing the port forward deck

After fixing the deck

It was the turn of the port deck panel for fixing to the hull. There was enough epoxy to do it, but I suspect I shall not have sufficient for doing the starboard panel. It will be a case of buying a small quantity to finish the deck and for adding tape to the chines. The original ‘Sharpy’ does not have GRP tape along her chines, but my boat could well be launched off a beach, and I think that having tape along the chines will be a sensible thing to do.


I’m now able to make the coamings, plane off the edges of the deck panels where they overlap the hull sides, and get on with varnishing the spars and seat.

Saturday, May 28, 2011

Building ‘Sharpy’ Part 100

Masking tape removed prior to epoxying deck panels to the hull

Aft deck panels in place

This afternoon I epoxied the aft deck panels to the hull. Before doing so, I prepared the surfaces to be bonded by sandpapering and scoring them. I also laid newspaper under the panels to catch any drips. Obviously, I couldn’t do that to the transom floatation chamber, because it has been totally sealed, and it will remain that way, unless for some reason it has to be opened.


When the deck panels were in place, I removed a few dribbles of epoxy, both from the inside and outside of the side panels. Getting rid of epoxy dribbles before they harden is always better than waiting until they solidify, because more effort is required to file and sandpaper them away.


If I have enough epoxy to put the forward deck panels on, I may be able to do them tomorrow afternoon.

Friday, May 27, 2011

Mevagissey Tosher


The Semaine du Golfe for 2011 is due to take place between 30th May and 5th June. Travelling to the event is the owner of the Mevagissey Tosher, ‘Wild Goose’, along with his boat and crew. They left her on my drive last night, as a place of refuge, before continuing today to Portsmouth for the cross-channel ferry to Saint Malo, from where they will hope to make it by road to the Morbihan.


Tosher number 27 registered at Falmouth, but based at Tollesbury, is a fibreglass version built in 1975. She worked the waters of Falmouth for around 20 years and continues to be registered for fishing today.


Link


Semaine du Golfe
http://www.semainedugolfe.asso.fr/index.php?langue=gb&mod=accueil&action=

Photo of ‘Wild Goose’ under sail
http://www.semainedugolfe.asso.fr/media/bateau/504.jpg

Morbihan
http://en.wikipedia.org/wiki/Morbihan

Thursday, May 26, 2011

Building ‘Sharpy’ Part 99

Aft deck panels, their undersides coated with undercoat.

Today was similar to yesterday, in that I found myself busy doing things that had to be done; hence there was very little time for boatbuilding, but I managed to paint the remaining undersides of deck panels with undercoat and the other ones with a top coat.

Wednesday, May 25, 2011

Building ‘Sharpy’ Part 98

Masking tape removed from upper surfaces

There are other things besides boatbuilding. Today I was occupied mainly by them. However, I found moments for progressing with the boat. I was able to remove masking tape from the upper surfaces of the hull, paint the undersides of the forward deck panels with undercoat, and sand the remainder of the seat to get rid of paint on the ash slats.

Applying an undercoat to the inner surfaces of deck panels


When I have finished painting the undersides of the deck panels I’ll be ready for fixing them to the hull. It looks as though I’ll need more epoxy to do it, and to apply GRP tape to the chines. Epoxy from UK Resins is good, because the ratio of hardener to resin is not critical. The recommended mix is two of resin to one of hardener. This is easy to guess when mixing small quantities. I’ve never had any problems with it, but I’m finding the cost of postage and packing very high, and I’m wondering if I can get a better deal locally.

I'm hoping the seat will look smart when the old paint has been sanded off, and the slats have been varnished


‘Sharpy’s’ spars will have to be varnished, but before I can do that, I’ll need to check their measurements and drill holes for attaching the sail.

Tuesday, May 24, 2011

Building ‘Sharpy’ Part 97

Sail and spars

Sail again

This afternoon I took the opportunity for collecting ‘Sharpy’s’ sail from Wilkinson Sails at Burnham-on-Crouch. Back at home I laid it on the lawn and placed the spars approximately where they should be attached to the sail. My first impression was that it was smaller than I imagined it would be. The boom and yard seemed too long. Perhaps I fashioned them longer than shown on the plans as a safeguard? It was such a long time ago that I made them I can’t remember if I did. I shall have to check the measurements I gave Mick. I’m hoping I let him have the ones for the larger, revised sail. If not, I’m stuck with what I’ve got. I must say the standard of Mick’s workmanship is excellent.

Upper coat, bow

Upper coat, amidships

I didn’t spend more time checking the sail because I wanted to paint the interior of the hull with an upper coat, which I managed to complete shortly before sunset. Unless I keep working each day at the boat, it will go on for ever. Painting the undersides of the deck panels is my next priority. When that has been done, I’ll be able to fix them to the hull.

Monday, May 23, 2011

Building ‘Sharpy’ Part 96

Masking tape on upper surfaces

Painting the boat’s interior was straightforward, but rather longwinded. First, I had to mask all of the upper surfaces that will be coated with epoxy when the decks are being joined to the hull. There were no complications, except I had to avoid leaving drips when I was painting underneath the sheer strakes and central supports for the deck panels.

Close-up


I used International Pre-Kote which is an excellent undercoat suitable for one part finishes. The upper coat will be a warm off-white International Toplac, which I shall also have for the hull exterior. I may varnish her decks. I hesitate, because varnish takes more maintenance than paint, and exposes the wood to sunlight. Varnish also absorbs the suns rays, unlike a light coloured paint that reflects them.

750 ml of paint!


I was surprised that a 750 millilitre tin of paint was just enough to do the interior, excluding the underneath surfaces of the decks. I have yet to paint them.

Sunday, May 22, 2011

Building ‘Sharpy’ Part 95

Holes for rope handles

One of the chocks retaining the seat

Testing steering line

Lines attached to the yoke

Yes, I’ve got there in the end. No, the boat is not finished, but the interior is ready for painting! This afterrnoon I spent a little while preparing her, and I tested the steering system which seems to work OK. Finally, I did the last touches to the deck panels which included drilling holes through them for the rope lifting handles. Once again I tried the seat and chocks that secure it to the boat. None of the seating bits and pieces at this stage is permanently attached to the hull. In practice if I find the seating arrangement unsatisfactory I’ll ditch it and try something different.

Saturday, May 21, 2011

Crewing on ‘Ladybird’

Laid-back crew

Readers who have been following this Blog will know that I’ve had a series of mistresses. The latest one was ‘Ladybird’, a Seawych 19 twin keel sloop. When I first met her I eyed her up and down to see if she would do for the job I had in mind, which was to teach my nephew and his son how to sail. She more than fit the ‘Bill’. They learnt to sail and acquired their own shared mistress, a plastic dinghy they sail and race at Thorpe Bay Yacht Club.


‘Ladybird’ proved her worth last year when she took me along the South Coast from Burnham-on-Crouch to the far West Country and back. We had a brilliant time together and I found her a delight to sail. Like all of my past mistresses, I decided she would have to go to the highest bidder, and I was surprised when my daughter said she wanted her. She persuaded me that if I taught her to sail she would buy the yacht. That was a deal I could not refuse, but in addition, I could sail ‘Ladybird’ any time she was not using her.


Today the roles were reversed. I was the crew and she was the skipper. She was not at all harsh and domineering like some skippers who change their personalities as soon as they embark. On the contrary, she was very gentle and didn’t make me work too hard at winching the sheets, hauling in the anchor, scrubbing the decks and starting the outboard.


In fact, we had a fine sail from ‘Ladybird’s’ Burnham mooring to the Crouch Buoy against the incoming tide. With the wind from South by East we reached both ways. There were quite a few yachts about and youngsters racing Optimists and Cadets. As usually happens on a fine summer’s day, the wind gradually increased to be at its maximum around 1600, which happened to be about high tide – just right for picking up the mooring with wind and tide together.


There on the mooring, we tightened up the luff of the roller Genoa, tidied the boat, put the cover on her mainsail and we were ferried by the Rice and Cole launch to the pontoon. I failed to notice that I had left my rucksack aboard the yacht, and it wasn’t until I was home that I realized I didn’t have it with me. Good daughter that she is, she went back to Burnham and collected it for me.


My latest mistress is being tailor-made, fashioned in my garage. She will be cheaper to keep, and I have a feeling she may be my last, but I’ve said that before and I’ve been proven wrong. Time will tell, but I’m looking forward to sailing ‘Sharpy’, a 15 foot keelboat.

Friday, May 20, 2011

Building ‘Sharpy’ Part 94

Bin sides fitting nicely

As expected, I helped with laying the lawn at my daughter’s place, which left me with the afternoon for boatbuilding. A lovely warm afternoon was conducive to epoxying the side bin panels. After trimming them it was comparatively easy to install them, first by securing their ends with screws to adjacent bulkheads and frames, then by infilling with epoxy. While I was epoxying I filled a few seams around the keel box.


That was it. There’s only a couple of small things to do before I start painting the interior and under the deck panels. I need to make two small wooden cleats for lines that will be used for securing the steering line pulleys. That will enable me to perfectly adjust the position of each pulley so that the steering lines pass through holes in the central frame and deck supports pieces without rubbing against their sides.


I had the good news that my lateen sail is ready for collection.

Thursday, May 19, 2011

Building ‘Sharpy’ Part 93

Nailed and epoxied

I couldn’t make a start until this afternoon; even then I had to leave off building the boat for collecting turf from a garden centre. Tomorrow, I can see myself spending time helping with laying it at my daughter’s place. I’m grateful I can do such things, but it makes work on the boat a juggling act. Now I’ve got that off my chest I can explain what was achieved during the afternoon and evening.


I had to convince myself that putting in bins either side of the cockpit was a good idea. This entailed plenty of thought which caused me to slightly modify how I would do it. I would add thin strips of plywood between the floor stringers and the panels to eliminate reservoirs where water could collect which would be difficult to remove - even with a good sponge.

Starboard Bin

Because the sides of the bins could be subjected to heavy loading brought about by the weight of my body pressing on them when the boat heels, I nailed and epoxied the iroko frames to the plywood. I had considered relying entirely on the epoxy to keep the components together, but wisdom overruled. Better to be safe than sorry.


There is a 17 inch gap for the seat between the upright sides of the bins. I shall be able to pop it into the space where it will sit on three supports, all of them screwed to the boat, rather than glued. At this stage, I’m not sure the seat will be satisfactory, and I may want to exchange it for another. Hence my diffidence regarding making the seat a permanent feature.


My next job will most likely be trimming the bin sides and fixing them to the boat. I have yet to prepare the edging of the cockpit for the coaming and make it. I doubt I’ll be able to attach the coaming to the deck panels until the latter have been fixed to the hull.

Wednesday, May 18, 2011

Building ‘Sharpy’ Part 92

Side bins' panels

Very shortly I shall hope to finish fixing the seat to the hull in such a way that it can be removed relatively easily so that I can replace it if necessary, and so that I can have access to the area under it for maintenance. Part of the process entails making side bins which will help secure the seat, but more importantly the upright sides of the bins, one on either side of the seat, will stop me sliding off it when the boat is heeling.


I shall make good use of the bins for storing small items such as my lunch, Thermos, sun hat, suncream etc.

Positions of side bins


This afternoon I made the sides for the bins from recycled iroko and plywood. There are a few colour blemishes on the iroko, but they won’t be seen. More than likely I shall paint the bins, rather than varnish them.

Tuesday, May 17, 2011

Building ‘Sharpy’ Part 91

Twisted chair

I think my hunt for a seat has ended. After visiting second-hand furniture stores and dumps I noticed a skip hire disposal yard where there was a skip containing items made of non-ferrous metals. On closer inspection I found a bent aluminium and wooden slatted chair. Immediately I could see the potential. If I could straighten the thing out, I would have a lightweight seat with a back support. Furthermore, this seat would not retain water when I bring it into the boat on my feet after launching from a slipway or beach.

Central support for seat

I've stripped the paint off the seat - backrest yet to do

Back at home I set about straightening the seat after I cut it from its support frame. I more or less got it back into the original shape, and although not exactly so, I’m pleased with the result. After a lot of thinking, I worked out how I could mount the seat, and yet remove it if I find I’m not happy to keep it. The slats are made of ash, and when the paint has been removed they may be good enough for varnishing; if not, I can paint them.

View from astern

My priority is to mount the seat in the cockpit so that I can get on with painting the interior of the hull. I may make storage racks either side of the seat which would double as lateral support for the crew, so that I won’t slip off the seat. The storage racks would help secure the seat and provide handy, relatively dry spaces for small items.

Monday, May 16, 2011

Building ‘Sharpy’ Part 90


This morning I thought I would have a look at a folding seat and a set of seat cushions at my local chandlers. On inspection they were not suitable. The folding seat was far too heavy, and the seat cushions were only water resistant. Continuing my hunt for a suitable seat I went to a scrap yard in the hope that I might see a Poly Seat, which is the sort recommended for the boat, but I could not find one. I have a feeling that I might get one at Ebay.


My hunt for seats would appear to have been unproductive, but I saw a couple of chairs in the window of second-hand furniture shop that may be suitable. Had the shop been open I would have made an enquiry regarding the price.


After lunch I levelled the block that will support the jam cleat for the keel system, and I fitted both inspection hatches into the deck panels.


There really isn’t anything more to do within the hull, except make mounts for the seat.


Considering the option of fixing the rubbing strips from the inside or from the outside, the latter would be the easiest and most sensible method.

Sunday, May 15, 2011

Building ‘Sharpy’ Part 89

Checking the fit of the reinforcing block for the keel haul cleat

Epoxying the block to the sheer strake

Precious little could be done on the boat today, but I managed to make one small thing, an oak reinforcing block for a cleat for a rope that will be attached to the pulley system for lifting and lowering the keel. When the starboard forward deck panel is glued to the hull, it will also be glued to the upper surface of the block. Because part of the butt plate for the fore and aft decks overlap the position of the cleat block, I’ll need to remove that part of the butt plate, so that the deck will be flush with the top of the side panel.


The only outstanding item for the interior is the seat, and according to my choice of seat, I’ll have to build supports for it. I shall not be able to paint that part of the inside of the hull until seat mounts have been fitted. As I mentioned yesterday, I’ll have to fix rubbing strips to the bottom of the boat, and I need to decide if I’m screwing them on from inside or out. If I decide on doing it from inside, I’ll not be able to start the painting until I finish joining the rubbing strips to the hull.


Before I paint the exterior of the hull I’ll most probably apply epoxied GRP tape to the chines – at least two layers in the central region, because that’s where most abrasion will occur when launching and retrieving the boat. She has to be placed on her side when inserting the keel; therefore GRP tape in that region will protect the plywood. Flaking of paint will be inevitable on the chines, but I can help minimize it by slightly rounding them before epoxying GRP tape. It will also be easier to make the tape adhere to the hull at the chines if they are rounded.

Saturday, May 14, 2011

Building ‘Sharpy’ Part 88

Mahogany Blocks

Mahogany Wedges between fittings and transom

Each day I try to do something towards building the boat. This afternoon I made four more mahogany blocks through which the rope handles will pass. I also made four small wedges of mahogany that I epoxied between the rudder fittings and the transom. They provide support for the gudgeon and pintle. I’m pleased with the result. In fact, I believe the rudder fittings will be stronger than the stainless steel, purpose-made ones shown in the plans.

Steering Line Pulley


Apart from fitting a line and a bungee to the rudder, I have now finished it.


Before I attach the decks I need to install a seat and paint the interior of the hull.

Rudder Pads

I am debating whether to attach the central fore and aft rubbing strips with screws screwed from inside the hull, or from outside. A disadvantage of the latter is that filler covering the countersunk screw heads may come out when the boat is repeatedly beached, and if this were to happen leaks could occur. A disadvantage of screwing from inside is in drawing the rubbing strips close to the exterior of the hull. Screwing them from the outside would be easier, because pressure can be brought to bear on the strips when the screws are tightened.


If I choose to attach the rubbing strips by screwing from inside, I shall have to fix them to the hull before fixing the decks.


I shall need to install two inspection hatches before joining the decks to the hull. There will be one giving access to a watertight chamber forward of the cockpit, and another to one after it. There will be no access to the bow and stern chambers. These will be absolutely watertight. Even if they were holed, there would be ample buoyancy to keep the boat afloat, despite the 80 lbs keel weights. I could of course, ditch the keel if the push came to the push, assuming I had time!

Friday, May 13, 2011

Building ‘Sharpy’ Part 87

I give my apologies to readers, because Blogger lost two of my recent posts - Parts 85 and 86.

Therefore I've spent a while uploading them again, so today I’ll let the photos do the talking.

Making Discs for increasing the thickness of the rudder to match the width of the slot in the stock.

Finding positions for handle reinforcements

Handle reinforcements

Testing Yoke

Testing positions for steering blocks